
Target Audience: Beginners | Estimated Read Time: 5 min
Key Takeaways:
- Learn to create filters in Gmail
- Automatically organize messages in your inbox
- Apply labels to messages as they arrive
Struggling to keep your Gmail inbox organized? In this guide, we’ll show you how to create filters in Gmail that automatically sort your messages into labeled folders as they come into your inbox.
Step 1: Create a New Label in Gmail
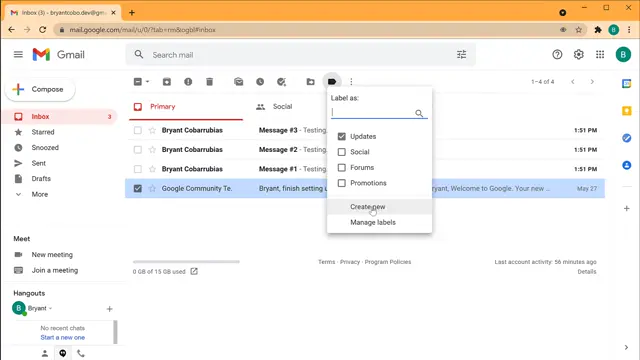
To start organizing your inbox, click the email you want to label. Then, select the ‘Labels’ button in the toolbar. You can either choose an existing label or click ‘Create new’. Type the name of your new label, and click ‘Create’ to tag the message. This will help you manage similar emails together. For detailed guidance on creating folders, you can check this Create folders in Gmail step.
Step 2: Set Up a Filter for Incoming Messages
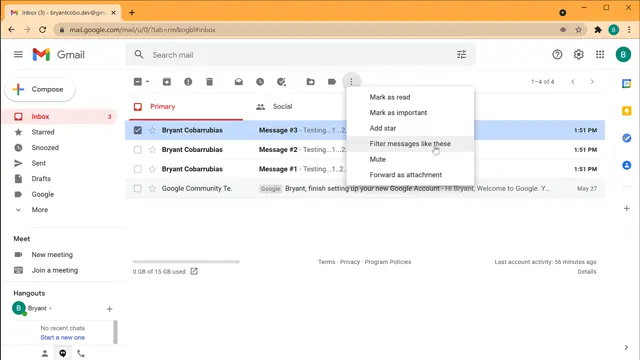
Next, to apply automated organization, click on any message and go to the ellipsis menu. Select the option to ‘Filter messages like these’. This will allow Gmail to automatically apply rules to incoming messages based on specific criteria like the sender’s email or the subject.
Step 3: Apply the Filter to Incoming Emails
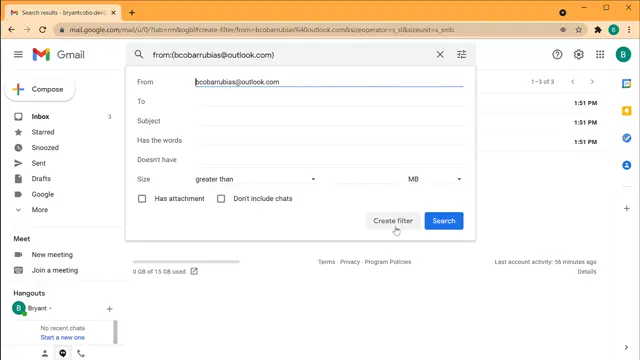
Now that you have created a filter, specify what to do when emails meeting your criteria arrive in your inbox. You can choose to ‘Skip Inbox’ (archive the email) or ‘Apply the label’. Select the appropriate label or create a new one if needed. This action will keep your inbox clean by automatically organizing similar messages.
Step 4: Manage Your Filters in Gmail Settings
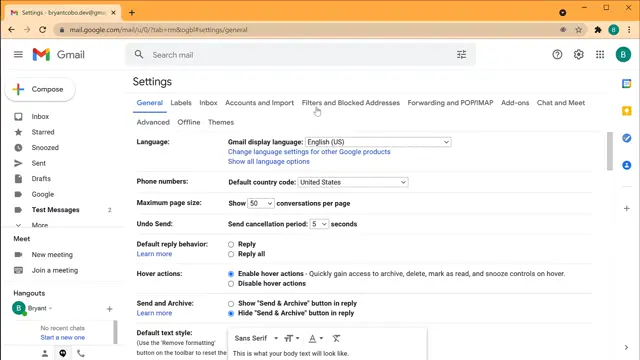
If you ever need to modify your filters, go to the settings by clicking on the gear icon and select ‘See all settings’. From there, navigate to the ‘Filters and Blocked Addresses’ tab where you can edit, delete or adjust your filters as your needs change.
Frequently Asked Questions
How do I create a new filter in Gmail?
Click on an email, select the ellipsis menu, and choose ‘Filter messages like these’ to set up your criteria.
Can I apply multiple filters to a single email?
Yes, you can set up multiple filters for incoming emails based on different criteria like sender, subject, or keywords.
What happens when a filter is applied to an email?
When a filter is activated, it can automatically archive, delete, or label emails that match your specified rules.
How can I edit or delete a filter?
Go to Gmail settings, navigate to ‘Filters and Blocked Addresses’, and you can edit or delete any existing filters from there.
Watch the Video Tutorial
Conclusion
By using filters in Gmail, you can automate the organization of your inbox and keep your email management efficient. Explore these steps and enjoy a more structured email experience!










Leave a comment